How to Add a Custom HTML Widget to Your Shopify Store
Introduction
Enhance your Shopify store’s functionality with a custom HTML widget. Whether you’re looking to integrate an RSS feed, showcase promotional banners, or add dynamic content, embedding a custom HTML widget is a simple and powerful way to upgrade your storefront.
This step-by-step guide walks you through the process of adding an HTML widget to your Shopify store, ensuring it works seamlessly with your existing design and improves user engagement.
Step-by-Step Instructions
Step 1: Create Your HTML Widget Code
Begin by generating your widget code. You can use a tool like FeedWind or write your custom HTML.
Example: Use FeedWind to create RSS widgets or other interactive elements.
Copy the generated HTML snippet.
Step 2: Log in to Shopify Admin
Go to Shopify and log in to your admin dashboard. If you don’t have an account, create one to start managing your online store.
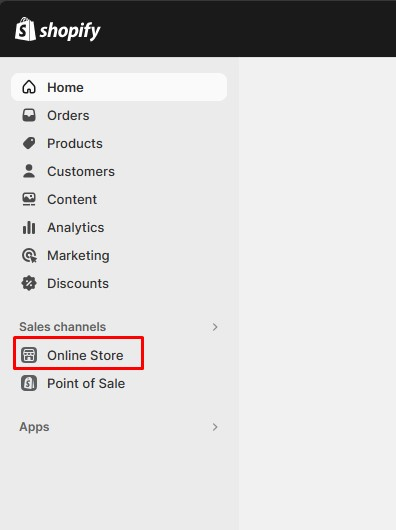
Step 3: Access the Online Store Settings
From your Shopify admin dashboard:
Navigate to the Online Store section.
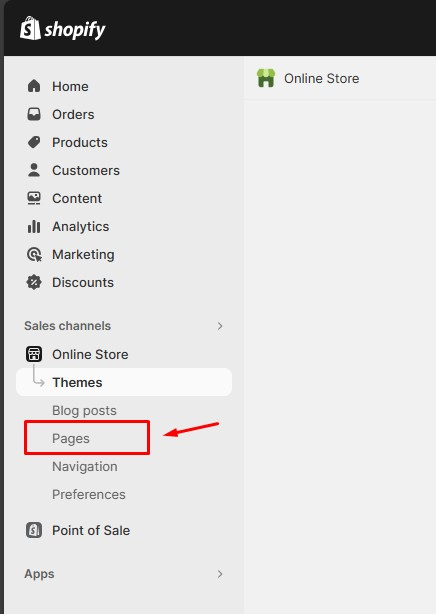
Select Pages from the left-hand menu.

Step 4: Open Pages Section
Click on the page where you want to embed the custom HTML widget. You can select the homepage, about us, or any specific product or collection page.

Step 5: Locate and Edit Target Page
Once inside the page editor:
Click Edit on the desired page.
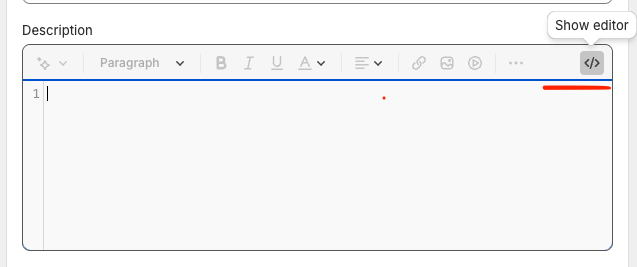
Look for the Show HTML option to access the page’s HTML code.

Step 6: Switch to HTML Mode
Toggle the editor to HTML mode. This allows you to view and edit the underlying HTML structure of the page.
Step 7: Paste the Widget Code
Paste the HTML code you generated in Step 1 into the appropriate section of the page.
Ensure proper placement to avoid disrupting the layout.
Example: Insert banners or dynamic feeds in header sections or promotional messages within the body.
Step 8: Save Changes
Click the Save button to apply the changes. Your widget is now part of the selected page.
Step 9: Preview and Finalize
Preview the page to see how the widget appears. Test its functionality and adjust placement or styling as needed for a seamless user experience.
Step 10: Success! 🎉
Congratulations! You’ve successfully added a custom HTML widget to your Shopify store.
Benefits of Adding HTML Widgets
Improved Engagement: Use widgets to display dynamic content like RSS feeds, promotional offers, or surveys.
Customization: Tailor the widget’s design and functionality to fit your store’s branding.
SEO Boost: Widgets like FeedWind can enhance on-page SEO by displaying fresh, relevant content.
Increased Conversions: Strategically placed widgets can highlight discounts or drive traffic to specific pages.
Frequently Asked Questions
Q: Can I limit widgets to specific pages?
A: Yes, by embedding the HTML code only on the desired pages.
Q: How do widgets affect page loading speed?
A: Ensure widgets are optimized and do not excessively load external scripts.
Q: Can I style the widget?
A: Absolutely! Use CSS to customize the appearance of your HTML widget.
Take your Shopify store to the next level with custom HTML widgets. Whether you're integrating a live feed, showcasing offers, or enhancing interactivity, this guide makes it easy. Start today and elevate your store’s functionality!
For any issues or customization needs, feel free to reach out to us at 📧 tentech.ai.2023@gmail.com.